Table of Contents
- 1. Intro to the Spring Security Tutorial: 3-Legged OAuth 1.0
- 2. Configuring the 3-Legged OAuth 1.0 Provider
- 3. Configuring the 3-Legged OAuth 1.0 Consumer
- 4. Conclusion
1. Intro to the Spring Security Tutorial: 3-Legged OAuth 1.0
This post is a Spring Security OAuth 1.0 3-Legged authentication tutorial. Spring Security OAuth supports 3-Legged authentication out of the box, this includes both the Provider and the Consumer side of the process. This is the third post in a three part series:
- Spring Security Tutorial: 0-Legged OAuth 1.0
- Spring Security Tutorial: 2-Legged OAuth 1.0
- Spring Security Tutorial: 3-Legged OAuth 1.0
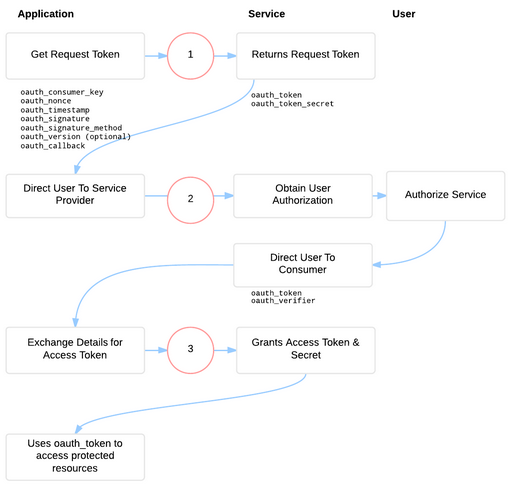 On the right is an image which explains the 3-Legged OAuth process and all the headers involved at each stage of the process. As in the previous two OAuth posts (0-Legged and 2-Legged OAuth 1.0), I borrowed the diagram from The OAuth Bible. If you’re interested in getting a good explanation of OAuth without reading the official specification, then I highly recommend you visit The OAuth Bible.
The full set of steps with their relevant Spring Security OAuth filters is listed below. You can check out the details for each by using Ctrl+Shift+T in Eclipse and copy pasting in the filter names:
- Get the Request Token: UnauthenticatedRequestTokenProcessingFilter
- Authorize the Request Token: UserAuthorizationProcessingFilter
- Get the Access Token: AccessTokenProcessingFilter
- Access Protected Resource: ProtectedResourceProcessingFilter
The post will explain how to configure the Provider and the Consumer. As with the previous OAuth posts you can download the source code at the bottom of the post. In the post I’ve kept things to the minimum required in order to get things working, but the source code contains some extra goodies.
2. Configuring the 3-Legged OAuth 1.0 Provider
The Provider is the web application which contains the Resource protected by OAuth and which requires user authentication in order to provide access to the Consumer web application. Once again there are a number of similarities between the configuration required here and the configuration used in the previous 0-Legged and 2-Legged OAuth posts. I’ll add all the necessary code here but I’ll refer back to those posts for certain explanations.
The Provider section of the post is split into 5 sections:
- Configuring the Web.xml
- Implementing the Protected REST Resource
- Configuring the Spring Application Contexts
- Implementing the OAuth ConsumerDetailsService
- Implementing the MVC Controller and JSPs
2.1 Provider: Configuring the Web.xml
Let’s start with the web.xml which is very similar to the 2-Legged OAuth configuration. The primary difference is that we have two Application Contexts: one for configuring Spring Security and one for Spring MVC.
<?xml version="1.0" encoding="UTF-8"?>
<web-app  xmlns="http://java.sun.com/xml/ns/javaee"
    xmlns:xsi="http://www.w3.org/2001/XMLSchema-instance"
    xsi:schemaLocation="http://java.sun.com/xml/ns/javaee http://java.sun.com/xml/ns/javaee/web-app_3_0.xsd"
    version="3.0" metadata-complete="true">

	<!-- Spring Config File -->
	<context-param>
		<param-name>contextConfigLocation</param-name>
		<param-value>
			classpath:mvc-applicationContext.xml
			classpath:security-applicationContext.xml
		</param-value>
	</context-param>


	<!-- Spring Listeners -->
	<listener>
		<listener-class>org.springframework.web.context.request.RequestContextListener</listener-class>
	</listener>
	<listener>
		<listener-class>org.springframework.web.context.ContextLoaderListener</listener-class>
	</listener>


    <!-- MVC Filter -->
    <servlet>
        <servlet-name>mvcDispatcher</servlet-name>
        <servlet-class>org.springframework.web.servlet.DispatcherServlet</servlet-class>
        <init-param>
            <param-name>contextAttribute</param-name>
            <param-value>org.springframework.web.context.WebApplicationContext.ROOT</param-value>
        </init-param>
        <load-on-startup>1</load-on-startup>
    </servlet>

    <servlet-mapping>
        <servlet-name>mvcDispatcher</servlet-name>
        <url-pattern>/</url-pattern>
    </servlet-mapping>


	<!-- Security Filter -->
	<filter>
		<filter-name>springSecurityFilterChain</filter-name>
		<filter-class>org.springframework.web.filter.DelegatingFilterProxy</filter-class>
		<init-param>
			<param-name>contextAttribute</param-name>
			<param-value>org.springframework.web.context.WebApplicationContext.ROOT</param-value>
		</init-param>
	</filter>
	<filter-mapping>
		<filter-name>springSecurityFilterChain</filter-name>
		<url-pattern>/*</url-pattern>
	</filter-mapping>


	<!--Jersey Servlet -->
	<servlet>
		<servlet-name>RestService</servlet-name>
		<servlet-class>com.sun.jersey.spi.spring.container.servlet.SpringServlet</servlet-class>
		<init-param>
			<param-name>com.sun.jersey.config.property.packages</param-name>
			<param-value>org.codehustler</param-value>
		</init-param>
		<init-param>
			<param-name>com.sun.jersey.config.feature.DisableWADL</param-name>
			<param-value>true</param-value>
		</init-param>
		<init-param>
			<param-name>com.sun.jersey.api.json.POJOMappingFeature</param-name>
			<param-value>true</param-value>
		</init-param>
		<load-on-startup>1</load-on-startup>
	</servlet>
	<servlet-mapping>
		<servlet-name>RestService</servlet-name>
		<url-pattern>/api/*</url-pattern>
	</servlet-mapping>

</web-app>
2.2 Provider: Implementing the Protected REST Resource
As with the 2-Legged OAuth post, this is identical to the 0-Legged OAuth post.
package org.codehustler.resource;

import javax.ws.rs.GET;
import javax.ws.rs.Path;
import javax.ws.rs.Produces;
import javax.ws.rs.core.MediaType;
import org.springframework.security.access.prepost.PreAuthorize;
import com.sun.jersey.spi.resource.Singleton;

@Singleton
@Path( "/protected")
@PreAuthorize("hasRole('ROLE_OAUTH')")
@Produces( MediaType.APPLICATION_JSON )
public class ProtectedResource
{
	public ProtectedResource() {}

	@GET
	public String getOAuthProtectedData()
	{
		// For demo purposes only, don't build your JSON responses like this! =)
		return "{\"protected\":\"This is some OAuth protected data coming from the Provider!\"}";
	}
}
2.3 Provider: Configuring the Spring Application Contexts
Unlike the previous posts we’re going to be using to separate Application Contexts. Note that all the configuration could sit in a single Application Context, the split is purely logical.
2.3.1 Spring Security Application Context
The Spring Security Application Context is where the configuration of the 3-Legged OAuth Provider is done. There is considerable overlap between this application context and the ones for 0-Legged OAuth and 2-Legged OAuth so I’ll explain the deltas below. Please refer to the previous posts to find out more about the configuration which isn’t explained below.
You’ll notice that the application context below actually defines a basic Login configuration. The reason for this is that the User must authenticate the Request Token and in order for that to happen the User must first log into the Provider web application. The Security Context used to authenticate the Request Token comes from the User’s logged in Security Context. I’ve written a detailed post on how to configure the Login Form in case you want more information on that. The username and password used to login are shown in the Application Context below.
- provider the provider is used to configure the OAuth 1.0 provider mechanism. Below I’ve broken down the attributes relevant to this article.
- user-approval-url this will take the user to the page used to authenticate the Request Token. We’re going to create a custom Controller / JSP in order to handle this authentication. These will be explained in a section below.
- authenticate-token-url this points to the Request Token authentication filter which takes the OAuth Token and authenticates it.
- access-granted-url if for some reason the Consumer doesn’t provide a callback URL to which the User should be redirected once they authenticate the Request Token, then this page will be loaded instead. This JSP page simply contains a success message stating that the token was successfully authenticated.
Let’s move onto the XML:
<?xml version="1.0" encoding="UTF-8" ?>
<b:beans xmlns:b="http://www.springframework.org/schema/beans"
		xmlns:xsi="http://www.w3.org/2001/XMLSchema-instance"
		xmlns="http://www.springframework.org/schema/security"
		xmlns:context="http://www.springframework.org/schema/context"
		xmlns:oauth="http://www.springframework.org/schema/security/oauth"
		xsi:schemaLocation="http://www.springframework.org/schema/security http://www.springframework.org/schema/security/spring-security-3.1.xsd http://www.springframework.org/schema/context http://www.springframework.org/schema/context/spring-context-3.1.xsd http://www.springframework.org/schema/security/oauth http://www.springframework.org/schema/security/spring-security-oauth.xsd http://www.springframework.org/schema/beans http://www.springframework.org/schema/beans/spring-beans-3.1.xsd">

	<!-- Spring Annotation Driven Components -->
	<context:annotation-config />

	<!-- Global Security Settings -->
	<global-method-security pre-post-annotations="enabled" />

	<!-- Form Login Security -->
	<http use-expressions="true" access-denied-page="/login.jsp">
		<form-login authentication-failure-url="/login.jsp" default-target-url="/index.jsp" login-page="/login.jsp"
					login-processing-url="/login.do" username-parameter="username" password-parameter="password"/>
   		<logout logout-success-url="/login.jsp?out=1" logout-url="/logout.do"/>

   		<intercept-url requires-channel="https" pattern="/login.jsp" access="permitAll()" />
   		<intercept-url requires-channel="https" pattern="/**" access="hasRole('ROLE_USER')" />
	</http>

	<authentication-manager alias="authenticationManager">
		<authentication-provider>
			<user-service>
				<user name="user" password="user" authorities="ROLE_USER"/>
			</user-service>
		</authentication-provider>
	</authentication-manager>

	<!-- OAuth 1.0 3-Legged Security -->
	<b:bean id="oAuthAuthenticationHandler" class="org.springframework.security.oauth.provider.DefaultAuthenticationHandler" />
	<b:bean id="consumerDetailsService" class="org.codehustler.oauth.OAuthConsumerDetailsService"/>

	<oauth:provider consumer-details-service-ref="consumerDetailsService"
					token-id-param="oauth_token"
                  	token-services-ref="tokenServices"
                  	request-token-url="/oauth/request_token"
                  	user-approval-url="/oauth/confirm_access"
                  	authenticate-token-url="/oauth/authorize_token"
                  	access-token-url="/oauth/access_token"
					auth-handler-ref="oAuthAuthenticationHandler"
					access-granted-url="/request_token_authorized.jsp"
                  	require10a="false" />

	<oauth:token-services id="tokenServices" />

</b:beans>
2.3.2 Spring MVC Application Context
The Spring MVC Application Context ensures that the Controller used for the authentication of the Request Token is correctly initialised.
<?xml version="1.0" encoding="UTF-8"?>
<beans xmlns="http://www.springframework.org/schema/beans"
        xmlns:xsi="http://www.w3.org/2001/XMLSchema-instance"
		xmlns:mvc="http://www.springframework.org/schema/mvc"
        xmlns:context="http://www.springframework.org/schema/context"
        xsi:schemaLocation="http://www.springframework.org/schema/beans http://www.springframework.org/schema/beans/spring-beans-3.1.xsd http://www.springframework.org/schema/context http://www.springframework.org/schema/context/spring-context-3.1.xsd http://www.springframework.org/schema/mvc http://www.springframework.org/schema/mvc/spring-mvc-3.1.xsd">

	<!-- Spring Context Configuration -->
	<context:annotation-config />
	<context:component-scan base-package="org.codehustler" />


	<!-- MVC Configuration -->
	<mvc:annotation-driven/>
	<mvc:default-servlet-handler />

	<bean id="viewResolver" class="org.springframework.web.servlet.view.InternalResourceViewResolver">
		<property name="prefix" value="/WEB-INF/jsp/" />
		<property name="suffix" value=".jsp" />
	</bean>

</beans>
2.4 Provider: Implementing the OAuth ConsumerDetailsService
The ConsumerDetailsService is the same as the 0-Legged OAuth post.
package org.codehustler.oauth;

import java.util.ArrayList;
import java.util.List;

import org.springframework.security.core.GrantedAuthority;
import org.springframework.security.core.authority.SimpleGrantedAuthority;
import org.springframework.security.oauth.common.OAuthException;
import org.springframework.security.oauth.provider.ConsumerDetails;
import org.springframework.security.oauth.provider.ConsumerDetailsService;

public class OAuthConsumerDetailsService implements ConsumerDetailsService
{
	String consumerName = "John";
	String consumerKey = "3a4393c3da1a4e316ee66c0cc61c71";
	String consumerSecret = "fe1372c074185b19c309964812bb8f3f2256ba514aea8a318";

	public OAuthConsumerDetailsService() {}


	@Override
	public ConsumerDetails loadConsumerByConsumerKey( String consumerKey ) throws OAuthException
	{
		if( consumerKey == null )
			throw new OAuthException("No credentials found for the consumer key [" + consumerKey + "]");

		if( !consumerKey.equals( this.consumerKey ) )
			throw new OAuthException("No credentials found for the consumer key [" + consumerKey + "]");

		List<GrantedAuthority> authorities = new ArrayList<GrantedAuthority>();
		authorities.add( new SimpleGrantedAuthority("ROLE_OAUTH") );

		return new OAuthConsumerDetails(
				consumerName,
				consumerKey,
				consumerSecret,
				authorities );
	}

}
The OAuthConsumerDetails in the case of 3-Legged OAuth actually differs from the previous implementations. Instead of implementing the ExtraTrustConsumerDetails interface (used specifically for 0-Legged and 2-Legged OAuth) we’ll be implementing the ConsumerDetails interface.
package org.codehustler.oauth;

import java.util.List;

import org.springframework.security.core.GrantedAuthority;
import org.springframework.security.oauth.common.signature.SharedConsumerSecretImpl;
import org.springframework.security.oauth.common.signature.SignatureSecret;
import org.springframework.security.oauth.provider.ConsumerDetails;

public class OAuthConsumerDetails implements ConsumerDetails
{
	private static final long serialVersionUID = 1L;
	private final String consumerName;
	private final String consumerKey;
	private final SignatureSecret signatureSecret;
	private final List<GrantedAuthority> authorities;

	public OAuthConsumerDetails( String consumerName, String consumerKey,
			String signatureSecret, List<GrantedAuthority> authorities )
	{
		this.consumerName = consumerName;
		this.consumerKey = consumerKey;
		this.signatureSecret = new SharedConsumerSecretImpl(signatureSecret);
		this.authorities = authorities;
	}

	public String getConsumerName()
	{
		return consumerName;
	}

	public String getConsumerKey()
	{
		return consumerKey;
	}

	public SignatureSecret getSignatureSecret()
	{
		return signatureSecret;
	}

	public List<GrantedAuthority> getAuthorities()
	{
		return authorities;
	}
}
Now we can move onto the final piece of the puzzle. The MVC Controller and the relevant JSP pages.
2.5 Provider: Implementing the MVC Controller and JSPs
The Controller and JSPs below are required in order to complete the configuration of the Provider.
2.5.1 Confirm Access Controller and JSP
This is the page used to prompt the User to authenticate the Request Token. I’ve implemented an incredibly simple version which presents to the User a button which can be used to authenticate the token. However, if your ConsumerDetails implemented the ResourceSpecificConsumerDetails you could actually use the getResourceName() and the getResourceDescription() methods to provide the User with more information about what they are authenticating the token for. In order to use those in the JSP below you would need to autowire the OAuthProviderTokenServices and the ConsumerDetailsService into the ConfirmAccessController. You could then use the oauth_token shown below to fetch the OAuthProviderToken which givves you the Consumer Key needed to call the loadConsumerByConsumerKey method which in turn will give you the ResourceSpecificConsumerDetails. This can then be added to the ModelAndView and accessed in the JSP page.
The controller:
package org.codehustler.controller;

import javax.servlet.http.HttpServletRequest;
import javax.servlet.http.HttpServletResponse;

import org.springframework.stereotype.Controller;
import org.springframework.web.bind.annotation.RequestMapping;
import org.springframework.web.bind.annotation.RequestMethod;
import org.springframework.web.servlet.ModelAndView;

@Controller
public class ConfirmAccessController
{
	public ConfirmAccessController() {}


	@RequestMapping( value = "/oauth/confirm_access", method = RequestMethod.GET )
	public ModelAndView confirmAccess( HttpServletRequest request, HttpServletResponse response )
	{
		String token = request.getParameter( "oauth_token" );
		String callback = request.getParameter( "oauth_callback" );

		if( token == null )
			throw new IllegalArgumentException("No Request Token provided for authorization.");

		ModelAndView mav = new ModelAndView( "confirm_access" );
		mav.addObject( "oauth_token", token );
		mav.addObject( "oauth_callback", callback );
		return mav;
	}
}
The JSP page:
<%@ taglib prefix="c" uri="http://java.sun.com/jsp/jstl/core" %>
<!DOCTYPE html>
<html>
	<head>
		<title>Spring Security Tutorial - 3-Legged OAuth 1.0 - Provider Server!</title>
	</head>
	<body>
		<H1>Authorize the Request Token!</H1>

		<p>Please authorize the Request Token.</p>

		<form action="<c:url value="/oauth/authorize_token"/>" method="post">
	        <input name="oauth_token" value="<c:out value="${oauth_token}"/>" type="hidden"/>
	        <c:if test="${!empty oauth_callback}">
	        	<input name="callbackURL" value="<c:out value="${oauth_callback}"/>" type="hidden"/>
	        </c:if>
		<input value="Authorize" name="submit" type="submit"/>
	      </form>
	</body>
</html>
2.5.2 Login JSP
This is a simple Login page. Checkout the Login Form post if you want more information on how to configure a custom form for your web application.
<%@ taglib prefix="c" uri="http://java.sun.com/jsp/jstl/core" %>
<%@ page language="java" import="javax.servlet.jsp.PageContext" %>
<!DOCTYPE html>
<html>
	<head>
		<title>Spring Security Tutorial - 3-Legged OAuth 1.0 - Provider Server!</title>
	</head>

	<body>
		<H1>Spring Security Tutorial - 3-Legged OAuth 1.0 - Provider Login!</H1>

		<p>You must login in order to Authorize the Request Token.</p>
		<p><strong>Username</strong>: user</p>
		<p><strong>Password</strong>: user<br><br></p>

		<form id="form" action="<c:url value='/login.do'/>" method="POST">

			<c:if test="${not empty SPRING_SECURITY_LAST_EXCEPTION}">
				<div>
					<c:out value="${SPRING_SECURITY_LAST_EXCEPTION.message}"/>
				</div>
			</c:if>
			<c:if test="${not empty param.out}">
				<div>
					You've logged out successfully.
				</div>
			</c:if>

			Username:<br>
			<input type="text" name="username" value=""/><br><br>
			Password:<br>
			<input type="password" name="password" value=""/>

			<input value="Login" name="submit" type="submit"/>
		</form>
	</body>
</html>
Usually the Consumer will provide a callback URL to which the Provider should redirect once the Request Token has been authenticated. However, if the callback URL is not provided, this page will be loaded instead.
<%@ taglib prefix="c" uri="http://java.sun.com/jsp/jstl/core" %>
<!DOCTYPE html>
<html>
	<head>
		<title>Spring Security Tutorial - 3-Legged OAuth 1.0 - Provider Server!</title>
	</head>
	<body>
		<H1>Request Token Authorized!</H1>
		<p>You have successfully authorized the Request Token.</p>
	</body>
</html>
3. Configuring the 3-Legged OAuth 1.0 Consumer
The Consumer is the web application which uses the REST resource protected by OAuth. The Consumer functionality is provided out of the box by the Spring Security OAuth library.
The Consumer section of the post is split into 4 sections:
- Configuring the Web.xml
- Configuring the Spring Security Application Context
- Implementing the Proxy REST Resource
- Implementing the Error JSP
3.1 Consumer: Configuring the Web.xml
Below is the web.xml required for the Consumer. You’ll notice that we’ve setup the Spring Security filter as this is required by the OAuth Consumer classes.
<?xml version="1.0" encoding="UTF-8"?>
<web-app  xmlns="http://java.sun.com/xml/ns/javaee"
    xmlns:xsi="http://www.w3.org/2001/XMLSchema-instance"
    xsi:schemaLocation="http://java.sun.com/xml/ns/javaee http://java.sun.com/xml/ns/javaee/web-app_3_0.xsd"
    version="3.0" metadata-complete="true">

	<!-- Spring Config File -->
	<context-param>
		<param-name>contextConfigLocation</param-name>
		<param-value>
			classpath:security-applicationContext.xml
		</param-value>
	</context-param>


	<!-- Spring Listeners -->
	<listener>
		<listener-class>org.springframework.web.context.request.RequestContextListener</listener-class>
	</listener>
	<listener>
		<listener-class>org.springframework.web.context.ContextLoaderListener</listener-class>
	</listener>


	<!-- Security Filter -->
	<filter>
		<filter-name>springSecurityFilterChain</filter-name>
		<filter-class>org.springframework.web.filter.DelegatingFilterProxy</filter-class>
		<init-param>
			<param-name>contextAttribute</param-name>
			<param-value>org.springframework.web.context.WebApplicationContext.ROOT</param-value>
		</init-param>
	</filter>
	<filter-mapping>
		<filter-name>springSecurityFilterChain</filter-name>
		<url-pattern>/*</url-pattern>
	</filter-mapping>


	<!--Jersey Servlet -->
	<servlet>
		<servlet-name>RestService</servlet-name>
		<servlet-class>com.sun.jersey.spi.spring.container.servlet.SpringServlet</servlet-class>
		<init-param>
			<param-name>com.sun.jersey.config.property.packages</param-name>
			<param-value>org.codehustler.resource</param-value>
		</init-param>
		<init-param>
			<param-name>com.sun.jersey.config.feature.DisableWADL</param-name>
			<param-value>true</param-value>
		</init-param>
		<init-param>
			<param-name>com.sun.jersey.api.json.POJOMappingFeature</param-name>
			<param-value>true</param-value>
		</init-param>
		<load-on-startup>1</load-on-startup>
	</servlet>
	<servlet-mapping>
		<servlet-name>RestService</servlet-name>
		<url-pattern>/api/*</url-pattern>
	</servlet-mapping>
</web-app>
3.2 Consumer: Configuring the Spring Security Application Context
This section contains the 3-Legged Consumer configuration. This configuration is almost identical to the 2-Legged OAuth Application Context. The primary difference is the introduction of an error page in case there is a problem with the authentication of the Request Token.
- oauth-failure-page this is the JSP page to which the User will be redirected if there is an OAuth failure.
As with the 2-Legged implementation, we need a dummy AuthenticationEntryPoint in order to initialise the Spring Security filters. This is an empty class which implements the AuthenticationEntryPoint interface. Moving onto the actual Application Context:
<?xml version="1.0" encoding="UTF-8" ?>
<b:beans xmlns:b="http://www.springframework.org/schema/beans"
		xmlns:xsi="http://www.w3.org/2001/XMLSchema-instance"
		xmlns="http://www.springframework.org/schema/security"
		xmlns:context="http://www.springframework.org/schema/context"
		xmlns:oauth="http://www.springframework.org/schema/security/oauth"
		xsi:schemaLocation="http://www.springframework.org/schema/security http://www.springframework.org/schema/security/spring-security-3.1.xsd http://www.springframework.org/schema/context http://www.springframework.org/schema/context/spring-context-3.1.xsd http://www.springframework.org/schema/security/oauth http://www.springframework.org/schema/security/spring-security-oauth.xsd http://www.springframework.org/schema/beans http://www.springframework.org/schema/beans/spring-beans-3.1.xsd">

	<!-- Spring Annotation Driven Components -->
	<context:annotation-config />
	<context:component-scan base-package="org.codehustler" />


	<!-- Client Security Configuration -->
  	<http use-expressions="true" entry-point-ref="authenticationEntryPoint">
    	<intercept-url pattern="/**" access="permitAll()" />
    </http>

	<b:bean id="authenticationEntryPoint" class="org.codehustler.oauth.AuthenticationEntryPointImpl" />

	<authentication-manager alias="authenticationManager" />


	<!-- OAuth 1.0 3-Legged Client -->
	<oauth:consumer resource-details-service-ref="resourceDetails" requireAuthenticated="false" oauth-failure-page="/error.jsp" >
		<oauth:url pattern="/api/**" resources="protectedResource"/>
	</oauth:consumer>

	<oauth:resource-details-service id="resourceDetails">
		<oauth:resource id="protectedResource"
		                key="3a4393c3da1a4e316ee66c0cc61c71"
		                secret="fe1372c074185b19c309964812bb8f3f2256ba514aea8a318f05f9d703d524b8"
		                request-token-url="https://localhost:8443/provider/oauth/request_token"
		                user-authorization-url="https://localhost:8443/provider/oauth/confirm_access"
		                access-token-url="https://localhost:8443/provider/oauth/access_token"
		                user-authorization-token-param="oauth_token"/>
	</oauth:resource-details-service>

	<b:bean id="oauthRestTemplate" class="org.springframework.security.oauth.consumer.client.OAuthRestTemplate">
		<b:constructor-arg ref="protectedResource" />
	</b:bean>

</b:beans>
3.3 Consumer: Implementing the Proxy REST Resource
This is identical to the 2-Legged OAuth Proxy Resource.
package org.codehustler.resource;

import java.net.URI;
import java.security.cert.X509Certificate;

import javax.net.ssl.HostnameVerifier;
import javax.net.ssl.HttpsURLConnection;
import javax.net.ssl.SSLContext;
import javax.net.ssl.SSLSession;
import javax.net.ssl.SSLSocketFactory;
import javax.net.ssl.TrustManager;
import javax.net.ssl.X509TrustManager;
import javax.ws.rs.Consumes;
import javax.ws.rs.GET;
import javax.ws.rs.Path;
import javax.ws.rs.Produces;
import javax.ws.rs.core.MediaType;

import org.springframework.beans.factory.annotation.Autowired;
import org.springframework.security.oauth.consumer.client.OAuthRestTemplate;
import org.springframework.stereotype.Component;

import com.sun.jersey.spi.resource.Singleton;

@Singleton
@Component
@Path( "/proxy")
@Consumes( MediaType.APPLICATION_JSON )
@Produces( MediaType.APPLICATION_JSON )
public class ProxyResource
{
	private String endpointUrl = "https://localhost:8443/provider/api/protected";

	// RestTemplate specific for OAuth authenticated requests
	@Autowired
	private OAuthRestTemplate oauthRestTemplate;

	public ProxyResource()
	{
		initSSL();
	}

	@GET
	public String fetchOAuthProtectedData()
	{
		try
		{
			return oauthRestTemplate.getForObject( URI.create( endpointUrl ), String.class );
		}
		catch( Exception ex )
		{
			return ex.toString();
		}
	}

	private void initSSL()
	{
		try
		{
			SSLContext sc = SSLContext.getInstance("SSL");

			HostnameVerifier hv = new HostnameVerifier() {
				public boolean verify( String urlHostName, SSLSession session ) { return true; }
			};

			TrustManager[] trustAllCerts = new TrustManager[] { new X509TrustManager() {
				public X509Certificate[] getAcceptedIssuers() { return null; }
				public void checkClientTrusted( X509Certificate[] certs, String authType ) {}
				public void checkServerTrusted( X509Certificate[] certs, String authType ) {}
			}};

			sc.init( null, trustAllCerts, new java.security.SecureRandom() );

			SSLSocketFactory sslSocketFactory = sc.getSocketFactory();
			HttpsURLConnection.setDefaultSSLSocketFactory(sslSocketFactory);
			HttpsURLConnection.setDefaultHostnameVerifier(hv);
		}
		catch ( Exception e )
		{
			// Do some handling
		}
	}
}
3.4 Consumer: Implementing the Error JSP
The final component of the Consumer implementation is the error page used in case of an OAuth failure. This will display the relevant error message to the User.
<%@ taglib prefix="c" uri="http://java.sun.com/jsp/jstl/core" %>
<%@ page language="java" import="javax.servlet.jsp.PageContext" %>
<!DOCTYPE html>
<html>
	<head>
		<title>Spring Security Tutorial - 3-Legged OAuth 1.0 - Consumer Server!</title>
	</head>
	<body>
		<H1>Oops! OAuth threw a Wobbly!</H1>
		<p>There was a problem with the OAuth mechanism: </p>
		<c:if test="${not empty OAUTH_FAILURE_KEY}">
			<p><c:out value="${OAUTH_FAILURE_KEY.message}"/></p>
        </c:if>
	</body>
</html>
4. Conclusion
Implementing 3-Legged OAuth using Spring Security OAuth is incredibly simple and once you start looking at the classes in the Library it becomes very easy to understand how the process works. This is the last post in the OAuth 1.0 series. If you have any questions or problems please leave a comment below and I’ll try to answer as soon as I can.
The sample code used in this post (and all other posts with code samples) is available by subscribing below. The downloaded source code usually comes with a few goodies which aren’t in the post!
The source code is all configured using Maven, so you can be up and running by simply typing “mvn clean install tomcat7:run-war-only”. The README contained in the archive explains all you need to know.

- Spring Security Tutorial: Form Login Java Configuration - September 27, 2014
- Spring Security Tutorial: 3-Legged OAuth 1.0 - June 9, 2014
- Spring Security Tutorial: 2-Legged OAuth 1.0 - June 3, 2014