Table of Contents
1. Intro to the Spring Security Tutorial: 0-Legged OAuth 1.0
This post is a Spring Security OAuth 1.0 0-Legged authentication tutorial. The post will show you how to configure a signed fetch using the Spring Security OAuth library. This is the first post in a three part series:
- Spring Security Tutorial: 0-Legged OAuth 1.0
- Spring Security Tutorial: 2-Legged OAuth 1.0
- Spring Security Tutorial: 3-Legged OAuth 1.0
The first question is what is 0-Legged OAuth? People usually confuse 2-Legged or 1-Legged OAuth for what is effectively 0-Legged OAuth. To break this down, let’s take a look at the three steps (a.k.a. legs) involved in a regular 3-Legged OAuth 1.0 request:
- Get the Request Token
- Authorize the Request Token
- Get the Access Token
What we’re going to be doing is by-passing all of the steps above (i.e. 0-Legs) and making use of the OAuth Signature for authentiation. For a more detailed view on 0-Legged OAuth take a look at Andrew Arnott’s clear explanation on his blog, nerdbank. Regardless of the naming debate, the bottom line is that this is an excellent authentication mechanim for those looking to secure a REST API when it is being used by a trusted party and the user is not required to authorise the access to their data.
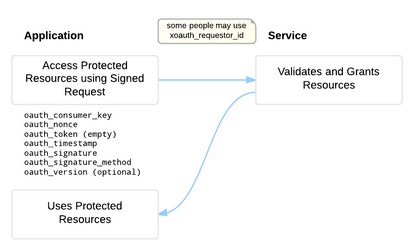 The image on the right comes from a site I recently came across called The OAuth Bible. The image shows the flow for a 0-Legged OAuth 1.0 request as well as the parameters that the OAuth Header must provide. The OAuth Bible does an incredible job at explaining the details of all the possible OAuth mechanisms you could use, all the way from 0-Legged OAuth 1.0 to 3-Legged OAuth 2.0. I highly recommend this resource to anyone wanting to learn more about OAuth (although they do refer to 0-Legged OAuth as 1-Legged OAuth =)).
Related specifically to this blog and Spring Security, another good resource is the OAuth 1 Developers Guide on the Spring site. This post explains all the components available in the OAuth 1.0 library. We will cover a number of these components in this article, but for a more indepth list of components, visit the link.
In this post we’re going to cover how to:
- Configure the 0-Legged OAuth 1.0 Provider
- Implement custom error handling in the Provider (JSON Responses!)
- Make signed requests to the Provider using the Jersey Client
The source code for this post is available for download at the bottom of the page. The archive contains a Maven project with two modules: Provider and Consumer. The two modules can be run using “mvn clean install tomcat7:run-war-only”. The README contained in the archive has more information about this. As usual, the source code contains some extra goodies, like the test page which can be used to try different consumerKeys and consumerSecrets!
2. Configuring the 0-Legged OAuth 1.0 Provider
The Provider is the web application which contains the REST resource protected by OAuth. For 0-Legged OAuth the Provider is the key component we need to configure as the consumer can use a number of different libraries to make it’s requests.
This section is broken down into 5 parts:
- Configuring the Web.xml
- Implementing the Protected REST Resource
- Configuring the Spring Security Application Context
- Implementing the OAuth ConsumerDetailsService
- Implementing the Custom Error Handling
2.1 Provider: Configuring the Web.xml
Below you will find the web.xml needed in order to configure the Spring Application Context and the Jersey REST resource. If you want a detailed explanation of the different components, have a look at the Spring Security Form Login post.
<?xml version="1.0" encoding="UTF-8"?>
<web-app  xmlns="http://java.sun.com/xml/ns/javaee"
    xmlns:xsi="http://www.w3.org/2001/XMLSchema-instance"
    xsi:schemaLocation="http://java.sun.com/xml/ns/javaee http://java.sun.com/xml/ns/javaee/web-app_3_0.xsd"
    version="3.0" metadata-complete="true">

	<!-- Spring Config File -->
	<context-param>
		<param-name>contextConfigLocation</param-name>
		<param-value>
			classpath:security-applicationContext.xml
		</param-value>
	</context-param>


	<!-- Spring Listeners -->
	<listener>
		<listener-class>org.springframework.web.context.request.RequestContextListener</listener-class>
	</listener>
	<listener>
		<listener-class>org.springframework.web.context.ContextLoaderListener</listener-class>
	</listener>


	<!-- Security Filter -->
	<filter>
		<filter-name>springSecurityFilterChain</filter-name>
		<filter-class>org.springframework.web.filter.DelegatingFilterProxy</filter-class>
		<init-param>
			<param-name>contextAttribute</param-name>
			<param-value>org.springframework.web.context.WebApplicationContext.ROOT</param-value>
		</init-param>
	</filter>
	<filter-mapping>
		<filter-name>springSecurityFilterChain</filter-name>
		<url-pattern>/*</url-pattern>
	</filter-mapping>


	<!--Jersey Servlet -->
	<servlet>
		<servlet-name>RestService</servlet-name>
		<servlet-class>com.sun.jersey.spi.spring.container.servlet.SpringServlet</servlet-class>
		<init-param>
			<param-name>com.sun.jersey.config.property.packages</param-name>
			<param-value>org.codehustler</param-value>
		</init-param>
		<init-param>
			<param-name>com.sun.jersey.config.feature.DisableWADL</param-name>
			<param-value>true</param-value>
		</init-param>
		<init-param>
			<param-name>com.sun.jersey.api.json.POJOMappingFeature</param-name>
			<param-value>true</param-value>
		</init-param>
		<load-on-startup>1</load-on-startup>
	</servlet>
	<servlet-mapping>
		<servlet-name>RestService</servlet-name>
		<url-pattern>/api/*</url-pattern>
	</servlet-mapping>

</web-app>
The plumbing is almost done, all we need now is a protected REST resource.
2.2 Provider: Implementing the Protected REST Resource
Let’s setup the REST resource we are going to protect with OAuth. As you’ll see below this resource doesn’t really need protecting, but, it’s wonderful as a basic example! =)
package org.codehustler.resource;

import javax.ws.rs.GET;
import javax.ws.rs.Path;
import javax.ws.rs.Produces;
import javax.ws.rs.core.MediaType;
import org.springframework.security.access.prepost.PreAuthorize;
import com.sun.jersey.spi.resource.Singleton;

@Singleton
@Path( "/protected")
@PreAuthorize("hasRole('ROLE_OAUTH')")
@Produces( MediaType.APPLICATION_JSON )
public class ProtectedResource
{
	public ProtectedResource() {}

	@GET
	public String getOAuthProtectedData()
	{
		// For demo purposes only, don't build your JSON responses like this! =)
		return "{\"protected\":\"This is some OAuth protected data coming from the Provider!\"}";
	}
}
As you can see it’s a pretty regular JAX-RS annotated class. An interesting annotation is the @PreAuthorize annotation. I like putting this annotation into my resources as it’s impossible to write bugless code, and this acts as a security catch-all.
Now that we’ve laid down the foundation we can move onto the OAuth specifics.
2.3 Provider: Configuring the Spring Security OAuth Application Context
This part contains the core of the 0-Legged OAuth 1.0 Provider configuration. First I’ll explain what is happening in the security-applicationContext.xml:
- global-method-security this is used to enable the @PreAuthorize tag. As I’ve mentioned in the Spring Security Form Login post, this tag enables a whole host of other goodies. Here’s a link to the documentation, look for Security Namespace Configuration
- http this is the container element for the HTTP security configuration:
- pattern the pattern matches the URLs that we want to process with the OAuth handlers. The REST endpoints have been setup under /api/, so this is the pattern we’ll look for.
- use-expressions this enables the use of expressions in the intercept-url access attribute. It’s not necessary but it leads to a clearer explanation of the access attribute.
- create-session this determines whether a session should be created. As we’re dealing with a stateless REST resource, we never want a session to be created. There are four options here: ifRequired, always, never, and stateless. I’ve used never as this works well when combined with Form-Login but if you have no such requirements, then switch this to stateless.
- entry-point-ref adds an AuthenticationEntryPoint (section 8.2.1) to Spring Security’s ExceptionTranslationFilter. This way we can manipulate the error responses being thrown by Spring Security.
- intercept-url this is where we specify the security for the application’s URLs. Note that at the moment we are handling all the API requests with a single intercept as we only have one REST resource. However, this isn’t a requirement, for example, you could create a super-user set of APIs and only allow access with the ROLE_SUPER_USER.
- oAuthProcessingFilterEntryPoint this class implements the AuthenticationEntryPoint. See the entry-point-ref above for a link to the documentation. For our purposes this is used to manipulate Spring Security’s error responses.
- oAuthAuthenticationHandler this is the OAuth callback interface for handing authentication details that are used when an authenticated request for a protected resource is received. In our example we are going to use the DefaultAuthenticationHandler provided with the OAuth library.
- consumerDetailsService this is the entry point into your database of consumers (OAuth speak for users). It is equivalent to the UserDetailsService used in the Form Login. Essentially you get given a consumerKey and you need to find the consumerSecret in your Database and return a ConsumerDetails object which the OAuth library can then use to authenticate the request.
- provider the provider is used to configure the OAuth 1.0 provider mechanism. Below I’ve broken down the attributes relevant to this article, but you can find a complete list with explanations on the OAuth 1.0 Developers Guide.
- consumer-details-service-ref the reference to the bean that defines the consumer details service. This is where we find the consumer in our Database and provide OAuth with the CustomerDetails.
- auth-handler-ref the reference to the bean that defines the authentication handler. Here we supply the DefaultAuthenticationHandler.
- token-services-ref the reference to the bean that defines the token services. The token-services is defined in it’s own element.
- token-services this is the token service. As you’ll see we don’t configure anything specific here. This is because we won’t be needing a token service. However, it is required as the OAuthProviderProcessingFilter asserts that an OAuthProviderTokenServices is set. Below I’ll explain how we by-pass the token services.
- authentication-manager registers the AuthenticationManager instance and allows its list of AuthenticationProviders to be defined.
This covers the simplest configuration possible in order to get 0-Legged OAuth 1.0 working. Here’s the code:
<?xml version="1.0" encoding="UTF-8" ?>
<b:beans xmlns:b="http://www.springframework.org/schema/beans"
		xmlns:xsi="http://www.w3.org/2001/XMLSchema-instance"
		xmlns="http://www.springframework.org/schema/security"
		xmlns:context="http://www.springframework.org/schema/context"
		xmlns:oauth="http://www.springframework.org/schema/security/oauth"
		xsi:schemaLocation="http://www.springframework.org/schema/security http://www.springframework.org/schema/security/spring-security-3.1.xsd http://www.springframework.org/schema/context http://www.springframework.org/schema/context/spring-context-3.1.xsd http://www.springframework.org/schema/security/oauth http://www.springframework.org/schema/security/spring-security-oauth.xsd http://www.springframework.org/schema/beans http://www.springframework.org/schema/beans/spring-beans-3.1.xsd">

	<!-- Spring Context Configuration -->
	<context:annotation-config />

	<!-- This allows authorization annotations to be used in our classes. See the Protected Resource. -->
	<global-method-security pre-post-annotations="enabled" />

	<!-- OAuth 1.0 0-Legged Security -->
	<http pattern="/api/**" use-expressions="true" create-session="never" entry-point-ref="oauthProcessingFilterEntryPoint">
		<intercept-url pattern="/**" requires-channel="https" access="hasRole('ROLE_OAUTH')" />
	</http>

	<b:bean id="oauthProcessingFilterEntryPoint" class="org.codehustler.oauth.OAuthProcessingFilterEntryPointImpl" />
	<b:bean id="oAuthAuthenticationHandler" class="org.springframework.security.oauth.provider.DefaultAuthenticationHandler" />
	<b:bean id="consumerDetailsService" class="org.codehustler.oauth.OAuthConsumerDetailsService"/>

	<oauth:provider consumer-details-service-ref="consumerDetailsService"
					auth-handler-ref="oAuthAuthenticationHandler"
					token-services-ref="tokenServices" />

	<oauth:token-services id="tokenServices" />

	<authentication-manager alias="authenticationManager" />

</b:beans>
With this knowledge we can move onto the actual implementation of the classes we need.
I’ve omitted an important component of OAuth authentication in this configuration which is the OAuthNonceServices. Spring Security OAuth provides a few different Nonce services out of the box:
- NullNonceServices as the name suggests this Provider does absolutely nothing. No Nonce validation will take place. Not recommended.
- ExpiringTimestampNonceServices this Provider will check that the Nonce has not expired when compared to a specified validity period (default setting is 12 hours). This provider does not store anything in memory (or elsewhere) and therefore it’s vulnerable to replay attacks.
- InMemoryNonceServices this Provider extends the ExpiringTimestampNonceServices and adds the ability to validate the Nonce for replay attacks. As the name suggests, this Provider will have a memory footprint.
Spring Security OAuth defaults to the ExpiringTimestampNonceServices which is a sensible option. However, if you have time, have a look at the InMemoryNonceServices as it really wouldn’t be difficult to make a version of it which uses a Cache or a Database to validate Nonces for replay attacks.
2.4 Provider: Implementing the OAuth ConsumerDetailsService
These are the classes responsible for supplying the OAuth filters with the details of the consumer attempting to access the protected resource. Our OAuthConsumerDetailsService implements the ConsumerDetailsService interface which has one method ConsumerDetails loadConsumerByConsumerKey( String consumerKey ). This takes a consumerKey and returns the ConsumerDetails associated to the key.
The code below actually uses a hardcoded key/secret pair but it would be incredibly easy to replace this with a Database call.
package org.codehustler.oauth;

import java.util.ArrayList;
import java.util.List;

import org.springframework.security.core.GrantedAuthority;
import org.springframework.security.core.authority.SimpleGrantedAuthority;
import org.springframework.security.oauth.common.OAuthException;
import org.springframework.security.oauth.provider.ConsumerDetails;
import org.springframework.security.oauth.provider.ConsumerDetailsService;

public class OAuthConsumerDetailsService implements ConsumerDetailsService
{
	String consumerName = "John";
	String consumerKey = "3a4393c3da1a4e316ee66c0cc61c71";
	String consumerSecret = "fe1372c074185b19c309964812bb8f3f2256ba514aea8a318";

	public OAuthConsumerDetailsService() {}


	@Override
	public ConsumerDetails loadConsumerByConsumerKey( String consumerKey ) throws OAuthException
	{
		if( consumerKey == null )
			throw new OAuthException("No credentials found for the consumer key [" + consumerKey + "]");

		if( !consumerKey.equals( this.consumerKey ) )
			throw new OAuthException("No credentials found for the consumer key [" + consumerKey + "]");

		List<GrantedAuthority> authorities = new ArrayList<GrantedAuthority>();
		authorities.add( new SimpleGrantedAuthority("ROLE_OAUTH") );

		return new OAuthConsumerDetails(
				consumerName,
				consumerKey,
				consumerSecret,
				authorities );
	}

}
The OAuthConsumerDetails returned in the code above implements the ExtraTrustConsumerDetails rather than the ConsumerDetails. This is a key piece of the puzzle which essentially tells the OAuth filter that this request is trusted and therefore does not need the Access Token. As you’ll see below, the ExtraTrustConsumerDetails adds the isRequiredToObtainAuthenticatedToken() method on which we return false, effectively telling the OAuth filter that an access token isn’t required.
The ExtraTrustConsumerDetails allows us to skip the Access Token portion of the authentication mechanism. This combined with no oauth_token being sent in the headers (see the second to the section of this post), effectively allows us to skip the Request Token and Access Token steps and get to the Protected Resource with a single signed request.
package org.codehustler.oauth;

import java.util.List;

import org.springframework.security.core.GrantedAuthority;
import org.springframework.security.oauth.common.signature.SharedConsumerSecretImpl;
import org.springframework.security.oauth.common.signature.SignatureSecret;
import org.springframework.security.oauth.provider.ConsumerDetails;
import org.springframework.security.oauth.provider.ExtraTrustConsumerDetails;

public class OAuthConsumerDetails implements ExtraTrustConsumerDetails
{
	private static final long serialVersionUID = 1L;
	private final String consumerName;
	private final String consumerKey;
	private final SignatureSecret signatureSecret;
	private final List<GrantedAuthority> authorities;

	public OAuthConsumerDetails( String consumerName, String consumerKey,
			String signatureSecret, List<GrantedAuthority> authorities )
	{
		this.consumerName = consumerName;
		this.consumerKey = consumerKey;
		this.signatureSecret = new SharedConsumerSecretImpl(signatureSecret);
		this.authorities = authorities;
	}

	public String getConsumerName()
	{
		return consumerName;
	}

	public String getConsumerKey()
	{
		return consumerKey;
	}

	public SignatureSecret getSignatureSecret()
	{
		return signatureSecret;
	}

	public List<GrantedAuthority> getAuthorities()
	{
		return authorities;
	}

	public boolean isRequiredToObtainAuthenticatedToken()
	{
		return false;
	}
}
Now we can move onto the final piece of the Provider, custom error handling.
2.5 Provider: Implementing the Custom Error Handling
This sections gives you the interception point that you should plug into in order to provide your own error responses to your consumers. The example below is very simple, but once again, it serves as a perfect starting point.
The point of interception is the OAuthProcessingFilterEntryPoint. You can find the details in the Spring Documentation on the AuthenticationEntryPoint (section 8.2.1).
package org.codehustler.oauth;

import java.io.IOException;

import javax.servlet.ServletException;
import javax.servlet.http.HttpServletRequest;
import javax.servlet.http.HttpServletResponse;
import javax.ws.rs.core.MediaType;

import org.springframework.security.core.AuthenticationException;
import org.springframework.security.oauth.provider.OAuthProcessingFilterEntryPoint;
import org.springframework.security.web.authentication.AuthenticationFailureHandler;

public class OAuthProcessingFilterEntryPointImpl extends OAuthProcessingFilterEntryPoint
{
	public void commence( HttpServletRequest request, HttpServletResponse response, AuthenticationException failure )
			throws IOException, ServletException
	{
		// TODO Add your custom error handling here.
		// Failures here will be Spring Security's.
		// Here are some of the Exceptions you can handle:
		// InsufficientAuthenticationException

		response.setCharacterEncoding( "UTF-8" );
		response.setStatus( HttpServletResponse.SC_UNAUTHORIZED );
		response.setContentType( MediaType.APPLICATION_JSON );

		// This response is for simplicity. Don't build your JSON responses like this! =)
		response.getWriter().println( "{\"Unauthorized\":\"" + failure + "\"}" );
	}
}
That’s it for error handling, now let’s build the Consumer so we can test our OAuth protected API.
3. Using the Jersey Client as a 0-Legged OAuth 1.0 Consumer
The Consumer contains the web application that will be making the signed requests to the Provider. In this case I’ve decided to use the Jersey Client libary to make the requests as it looked too complex to configure the Spring Security OAuth consumer package to do the same (we need to skip the request token, access token and authorization steps and the ProtectedResourceDetails doesn’t like that). The Spring Security OAuth consumer package deals better with 2-Legged and up requests, but we don’t need that complexity right now. In case the Jersey Client isn’t of your liking, there are many other Java libraries out there capable of the same, take a look on the OAuth.net site.
First let’s take a look at the web.xml. The only thing we need to configure is an endpoint which we can access in the browser, the endpoint can then trigger the request to the provider and we should see the outcome on our screens.
<?xml version="1.0" encoding="UTF-8"?>
<web-app  xmlns="http://java.sun.com/xml/ns/javaee"
    xmlns:xsi="http://www.w3.org/2001/XMLSchema-instance"
    xsi:schemaLocation="http://java.sun.com/xml/ns/javaee http://java.sun.com/xml/ns/javaee/web-app_3_0.xsd"
    version="3.0" metadata-complete="true">

	<!--Jersey Servlet -->

	<servlet>
		<servlet-name>RestService</servlet-name>
		<servlet-class>com.sun.jersey.spi.container.servlet.ServletContainer</servlet-class>
		<init-param>
			<param-name>com.sun.jersey.config.property.packages</param-name>
			<param-value>org.codehustler.resource</param-value>
		</init-param>
		<init-param>
			<param-name>com.sun.jersey.config.feature.DisableWADL</param-name>
			<param-value>true</param-value>
		</init-param>
		<init-param>
			<param-name>com.sun.jersey.api.json.POJOMappingFeature</param-name>
			<param-value>true</param-value>
		</init-param>
		<load-on-startup>1</load-on-startup>
	</servlet>
	<servlet-mapping>
		<servlet-name>RestService</servlet-name>
		<url-pattern>/api/*</url-pattern>
	</servlet-mapping>

</web-app>
Now let’s put together the proxy class which will make the call to our Provider. I’ll start with a quick breakdown of the code:
- initSSL() this overrides the default SSL Context and enables us to use HTTPS with an untrusted certificate. Note that this is OK for testing (you may not want to purchase a certificate for that) but definetely not for production! =)
- initClient() this initialises the Jersey Client and enables POJO mapping and Jackson as our JSON Mapper library.
- fetchOAuthProtectedData() this builds the WebResource and makes the request to our Provider.
- initOAuthFilter() this initialises the OAuth filter supplied with the Jersey Client. This is responsible for signing our request.
- getSignedWebResource() this applies the OAuth Filter to our Jersey Client.
Cutting to the chase:
package org.codehustler.resource;

import java.security.cert.X509Certificate;

import javax.net.ssl.HostnameVerifier;
import javax.net.ssl.HttpsURLConnection;
import javax.net.ssl.SSLContext;
import javax.net.ssl.SSLSession;
import javax.net.ssl.SSLSocketFactory;
import javax.net.ssl.TrustManager;
import javax.net.ssl.X509TrustManager;
import javax.ws.rs.Consumes;
import javax.ws.rs.GET;
import javax.ws.rs.Path;
import javax.ws.rs.Produces;
import javax.ws.rs.core.MediaType;
import javax.ws.rs.core.UriBuilder;

import org.codehaus.jackson.jaxrs.JacksonJaxbJsonProvider;

import com.sun.jersey.api.client.Client;
import com.sun.jersey.api.client.UniformInterfaceException;
import com.sun.jersey.api.client.WebResource;
import com.sun.jersey.api.client.config.ClientConfig;
import com.sun.jersey.api.client.config.DefaultClientConfig;
import com.sun.jersey.api.json.JSONConfiguration;
import com.sun.jersey.oauth.client.OAuthClientFilter;
import com.sun.jersey.oauth.signature.OAuthParameters;
import com.sun.jersey.oauth.signature.OAuthSecrets;
import com.sun.jersey.spi.resource.Singleton;

@Singleton
@Path( "/proxy")
@Consumes( MediaType.APPLICATION_JSON )
@Produces( MediaType.APPLICATION_JSON )
public class ProxyResource
{
	private String endpointUrl = "https://localhost:8443/api/protected";
	private final String SIGNATURE_METHOD = "HMAC-SHA1";
	private OAuthClientFilter oauthFilter;
	private Client client;

	public ProxyResource()
	{
		initSSL();
		initClient();
	}

	@GET
	public String fetchOAuthProtectedData()
	{
		initOAuthFilter( "3a4393c3da1a4e316ee66c0cc61c71", "fe1372c074185b19c309964812bb8f3f2256ba514aea8a318" );

		// Let's use the Jersey Client to make the request
		WebResource webResource = getSignedWebResource( endpointUrl );
		WebResource.Builder webBuilder = webResource.getRequestBuilder()
												 .accept( MediaType.APPLICATION_JSON )
												 .type( MediaType.APPLICATION_FORM_URLENCODED_TYPE );

		try
		{
			return webBuilder.get( String.class );
		}
		catch( UniformInterfaceException ex )
		{
			return ex.getResponse().getEntity( String.class );
		}
	}


	/**
	 * Get a WebResource instance with the OAuth filter applied
	 * @param endpointUrl
	 * @return
	 */
	public WebResource getSignedWebResource( String endpointUrl )
	{
		WebResource webResource = client.resource( UriBuilder.fromUri( endpointUrl ).build() );
		webResource.addFilter( oauthFilter );
		return webResource;
	}


	/**
	 * Initialise the Jersey Client
	 */
	private void initClient()
	{
		ClientConfig config = new DefaultClientConfig();
		config.getFeatures().put( JSONConfiguration.FEATURE_POJO_MAPPING, Boolean.TRUE );
		config.getClasses().add( JacksonJaxbJsonProvider.class );
		client = Client.create( config );
	}


	/**
	 * Initialise the Jersey OAuth Filter with the key and secret
	 * @param consumerKey
	 * @param consumerSecret
	 */
	private void initOAuthFilter( String consumerKey, String consumerSecret )
	{
		OAuthParameters params = new OAuthParameters();

		params.signatureMethod( SIGNATURE_METHOD );
		params.consumerKey( consumerKey );
		params.setVersion("1.0");
		params.nonce();

		OAuthSecrets secrets = new OAuthSecrets();
		secrets.consumerSecret( consumerSecret );

		oauthFilter = new OAuthClientFilter( client.getProviders(), params, secrets );
	}


	/**
	 * The purpose of the initialisation method is to modify the SSLContext
	 * and provide it to the HttpsURLConnection class. This will allow us to
	 * make SSL calls without using a trusted certificate which for testing
	 * purposes will suffice.
	 */
	public void initSSL()
	{
		try
		{
			SSLContext sc = SSLContext.getInstance("SSL");

			HostnameVerifier hv = new HostnameVerifier() {
				public boolean verify( String urlHostName, SSLSession session ) { return true; }
			};

			TrustManager[] trustAllCerts = new TrustManager[] { new X509TrustManager() {
				public X509Certificate[] getAcceptedIssuers() { return null; }
				public void checkClientTrusted( X509Certificate[] certs, String authType ) {}
				public void checkServerTrusted( X509Certificate[] certs, String authType ) {}
			}};

			sc.init( null, trustAllCerts, new java.security.SecureRandom() );

			SSLSocketFactory sslSocketFactory = sc.getSocketFactory();
			HttpsURLConnection.setDefaultSSLSocketFactory(sslSocketFactory);
			HttpsURLConnection.setDefaultHostnameVerifier(hv);
		}
		catch ( Exception e ) {
			// Do some handling
		}
	}
}
Now you will be able to access the endpoint above by navigating to http://domain.com/api/proxy. Note: the endpointUrl uses https://localhost:8443 which is the end point configured in the source code download.
The example above has hardcoded consumerKey and consumerSecrets. If you download the source code below you will get access to a test page on the consumer web application which can be used to try different key/secret combinations. This way you can explore the error handling better.
4. Looking at the OAuth Request Headers
Right, now that everything is working, lets take a look at the authorization headers that the Provider receives when a Consumer makes a request:
authorization: OAuth
oauth_signature="QUv%2Fdq1PyvSCtolbrIgub3XEg%2BE%3D",
oauth_nonce="6571f99d-f4f9-47d9-82f2-b1ee0bda2b6d",
oauth_version="1.0",
oauth_consumer_key="3a4393c3da1a4e316ee66c0cc61c71",
oauth_signature_method="HMAC-SHA1",
oauth_timestamp="1400788255"
If you refer back to the diagram at the beginning of this post, you will see that all the relevant Headers are present (except for oauth_token which instead of being empty, is simply omitted). As you can see there is only a single OAuth authentication step which effectively makes this a 0-Legged OAuth implementation. If you are still in doubt, checkout the Logs of the code sample =)
5. Conclusion
Once again another post comes to an end! Hopefully this will help anyone looking to secure their REST APIs using Spring Security’s OAuth library. As always, if you have any questions please leave a comment and I’ll try to answer as soon as possible.
The sample code used in this post (and all other posts with code samples) is available by subscribing below. The downloaded source code usually comes with a few goodies which aren’t in the post!
The source code is all configured using Maven, so you can be up and running by simply typing “mvn clean install tomcat7:run-war-only”. The README contained in the archive explains all you need to know.

- Spring Security Tutorial: Form Login Java Configuration - September 27, 2014
- Spring Security Tutorial: 3-Legged OAuth 1.0 - June 9, 2014
- Spring Security Tutorial: 2-Legged OAuth 1.0 - June 3, 2014